Affiliate Disclosure:Home Vacuum Zone is reader-supported. When you buy through links on our site, we may earn an affiliate commission at no additional cost to you. This does not influence our reviews or recommendations — we only recommend products we genuinely believe in.
A broken vacuum doesn’t always mean a trip to the repair shop or an expensive replacement. Many common problems - from lost suction to strange odors - can be fixed at home with basic tools and minimal technical knowledge. This comprehensive guide covers troubleshooting and repair for corded uprights, canister vacuums, cordless sticks, and robot vacuums.
Before diving into repairs, always unplug corded vacuums and remove batteries from cordless models. Safety first: if your vacuum is under warranty, contact the manufacturer before attempting any repairs to avoid voiding coverage.
Quick Troubleshooting Checklist
Use this checklist before disassembling anything:
- Is it plugged in/charged? Check outlet with another device; verify cordless battery is seated properly
- Is the dustbin full? Empty if more than 2/3 full
- Are filters clogged? Check pre-motor and post-motor filters
- Is the hose blocked? Remove and visually inspect for obstructions
- Is the brush roll spinning? Check for hair wrap or belt issues
- Are there airflow blockages? Inspect all air paths
If these quick checks don’t solve the problem, proceed to detailed troubleshooting below.
Vacuum Won’t Turn On
Power issues are among the most common vacuum problems. Systematic diagnosis will identify whether you’re dealing with a simple fix or a major failure.
Corded Vacuum Power Issues
Step 1: Test the Outlet Verify the outlet works by plugging in a lamp or phone charger. Try a different outlet to rule out electrical problems.
Step 2: Check the Power Cord Inspect the entire cord length for damage, kinks, or exposed wires. Flex the cord near the plug and vacuum body while attempting to power on - intermittent contact indicates internal wire breakage.
Step 3: Inspect the On/Off Switch Vacuum switches can fail from dust accumulation or worn contacts. Test with a multimeter if comfortable with electrical work:
- Unplug the vacuum
- Access the switch (usually requires removing a cover)
- Set multimeter to continuity mode
- Test across switch terminals with switch in both positions
- No continuity change indicates switch failure
Replacement switches are inexpensive and install with basic screwdrivers.
Step 4: Check Thermal Protector Many vacuums have thermal cutoff switches that trip when motors overheat. Symptoms: vacuum worked fine, suddenly stopped, and won’t restart even after cooling. The thermal protector may need replacement (a relatively affordable part).
Step 5: Motor Failure If all electrical components test good but the vacuum won’t run, the motor may have failed. Motor replacement is a significant expense for parts alone. For budget vacuums, replacement usually makes more economic sense than repair.
Cordless Vacuum Power Issues
Battery Problems:
- Check battery seating: Remove and reinsert the battery firmly
- Test charging: Verify the charger LED indicates charging; try a different outlet
- Battery age: Lithium-ion batteries degrade after 3-5 years. If runtime dropped gradually before total failure, battery replacement is likely needed
- Temperature issues: Batteries won’t charge if too hot or cold - let the vacuum reach room temperature
Testing Battery Health: A voltmeter can check battery voltage. Compare to the rated voltage (usually 21.6V for Dyson, various for others). A fully charged battery showing significantly lower voltage has failed cells and needs replacement.
Replacement Costs:
- Dyson: OEM batteries carry a premium; aftermarket options cost noticeably less
- Shark: Mid-range replacement cost
- Tineco: Mid-range replacement cost
- Off-brands: Often unavailable or uneconomical
Robot Vacuum Power Issues
Won’t Turn On:
- Check charging dock is plugged in and LED indicates power
- Clean charging contacts on both robot and dock with dry cloth
- Verify robot is properly seated on dock (alignment matters)
- Reset the robot (check manual for button combination)
- Replace battery if over 2 years old
Won’t Hold Charge: Robot vacuum batteries typically last 2-4 years. Replacement is relatively affordable and requires screwdriver disassembly.
Loss of Suction
Reduced suction is the most reported vacuum problem. The cause is usually airflow restriction rather than motor failure.

Step-by-Step Suction Diagnosis
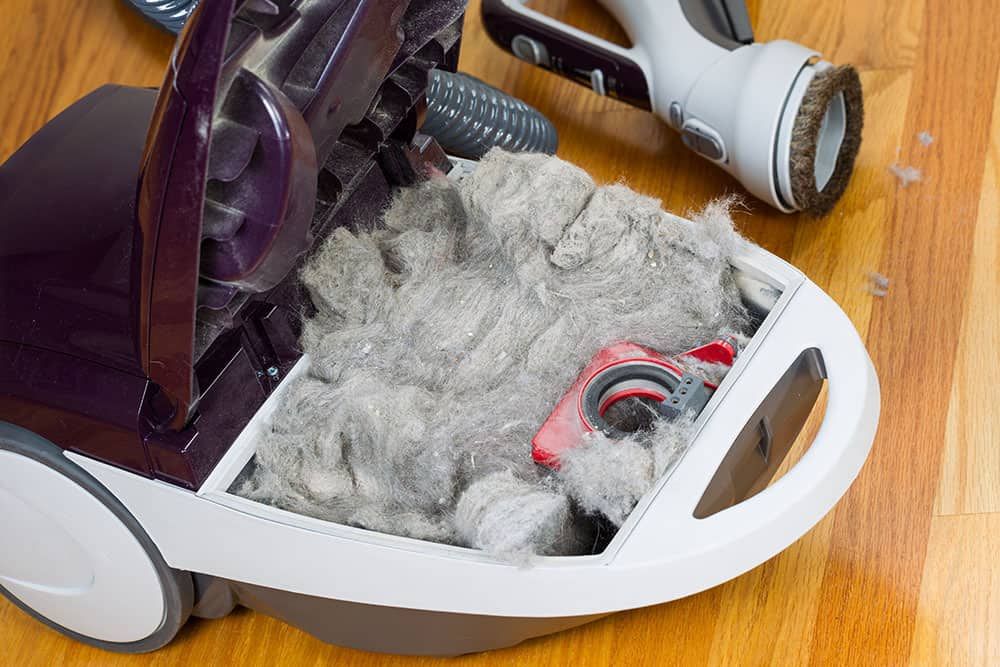
1. Empty the Dustbin/Bag Even partially full bins reduce airflow. Empty bagless vacuums when 2/3 full; replace bags when 3/4 full.
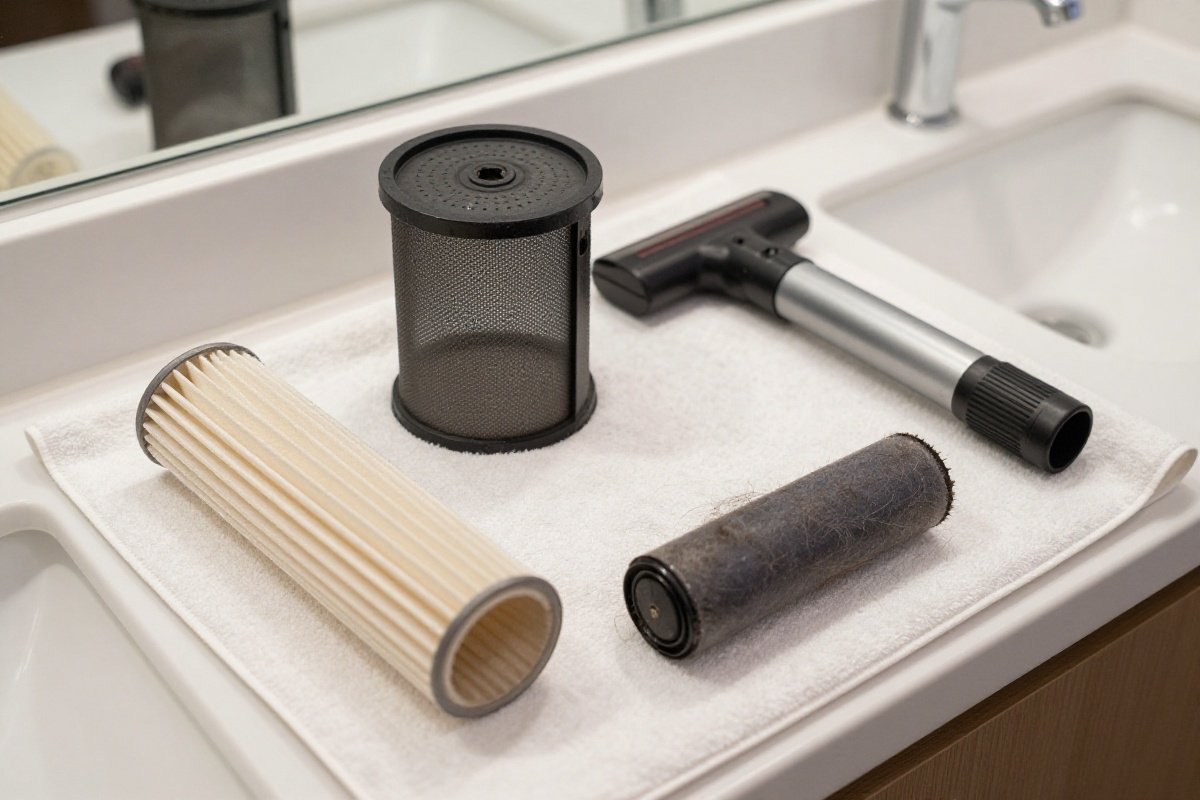
2. Clean or Replace Filters Clogged filters are the #1 cause of suction loss. Most vacuums have:
- Pre-motor filter: Protects the motor from debris; wash or replace monthly
- Post-motor/HEPA filter: Captures fine particles; replace every 6-12 months
Filter Maintenance by Type:
- Foam filters: Wash with warm water, air dry completely (24+ hours)
- Pleated paper filters: Tap to remove dust; replace when visibly dirty
- HEPA filters: Most are not washable - replace according to schedule
3. Check for Hose Blockages Disconnect the hose and visually inspect the entire length. Common obstructions:
- Socks and small clothing items
- Children’s toys
- Pet hair clumps
- Leaves and outdoor debris
Clearing Stubborn Blockages: Straighten a wire coat hanger and carefully push through the hose, or use a broom handle for longer hoses. Work gently to avoid puncturing hose walls.
4. Inspect the Brush Roll Area Remove the brush roll cover and check for:
- Hair wrapped around the brush (cut with scissors, peel off)
- Debris jammed in bearings
- Broken brush roll (replace if bristles are worn or roll is cracked)
5. Check Air Pathways Trace the airflow path from floor head to dustbin, inspecting for:
- Cracked or loose hose connections
- Clogged cyclone chambers (common in bagless vacuums)
- Blocked wands or extension tubes
Dyson-Specific Suction Issues
Dyson cyclone systems require specific maintenance:
Cleaning the Cyclone:
- Remove the clear bin
- Tap the cyclone over a trash can to remove dust
- Use a soft brush to clean shroud mesh
- Never submerge the cyclone in water (trapped moisture damages the motor)
Checking for Seal Damage: Dyson vacuums rely on rubber seals throughout the airflow path. Inspect:
- Bin seal (replace if cracked)
- Cyclone seal
- Filter housing seals
Damaged seals allow air leaks that dramatically reduce suction. Replacement seal kits are inexpensive.
Strange Odors
Unpleasant smells indicate bacterial growth, mold, or overheating components. Identify the odor type to pinpoint the cause. For an in-depth look at this common issue, see why does my vacuum smell.
Musty or Moldy Smells
Causes:
- Moisture in dustbin from wet debris
- Mold growth in filters
- Standing water in hose (wet/dry vacuums)
Solutions:
- Empty and thoroughly clean the dustbin with warm soapy water
- Replace all filters (washing rarely removes mold completely)
- Run a dry cloth through the hose to absorb moisture
- Store the vacuum in a dry location
- Use vacuum deodorizer tablets or essential oil drops on filters
Burning or Electrical Smells
Causes:
- Overheating motor
- Burning belt (rubber smell)
- Electrical component failure
Solutions:
- Stop using immediately - fire risk exists
- Unplug and let cool completely
- Inspect the belt for melting or damage
- Check for brush roll obstructions causing motor strain
- If smell persists after cooling, professional repair or replacement needed
Pet or Organic Odors
Causes:
- Pet hair and dander accumulation
- Food particles in dustbin
- Organic matter in brush roll
Deep Cleaning Protocol:
- Disassemble all removable parts
- Wash dustbin, filters, and brush roll with enzyme cleaner (Nature’s Miracle, enzymatic laundry detergent)
- Soak brush roll for 30 minutes
- Scrub all crevices with old toothbrush
- Dry completely (sunlight helps eliminate odors)
- Sprinkle baking soda in dustbin between uses
Vacuum Deodorizer Options
- Commercial tablets: Drop into bag or bin (very affordable)
- Essential oils: 2-3 drops on filters (lavender, lemon, eucalyptus)
- Fabric softener sheets: Place in bag or bin
- Baking soda: Sprinkle lightly in dustbin
Excessive Noise
Vacuum noise should be consistent. Sudden changes in volume or pitch indicate mechanical problems.
Grinding or Rattling Sounds
Likely Causes:
- Brush roll obstruction: Stop immediately, remove obstruction
- Broken brush roll: Replace if cracked or bearings failed
- Debris in fan: Disassemble and remove object
- Loose internal components: Tighten screws, check for broken plastic
High-Pitched Whining
Likely Causes:
- Motor bearing wear: Indicates motor failure approaching
- Belt slippage: Adjust or replace belt
- Air leak: Check seals and hose connections
Motor bearing wear usually means replacement time - repair costs typically exceed vacuum value for mid-range and budget models.
Suction Change with Noise
If noise increases but suction decreases, you likely have an air leak:
- Check hose connections
- Inspect hose for cracks or holes
- Verify bin/seal proper installation
Brush Roll Problems
The brush roll (beater bar) agitates carpet fibers to release dirt. When it fails, carpet cleaning performance drops dramatically. If you need a quick diagnostic first, our dedicated brush roll not working guide covers the most common causes.
Brush Roll Won’t Spin
Diagnosis Steps:
- Check for obstructions: Hair, string, or debris can jam the brush
- Inspect the belt: Broken or stretched belts are common
- Test motor connection: Ensure wiring is intact
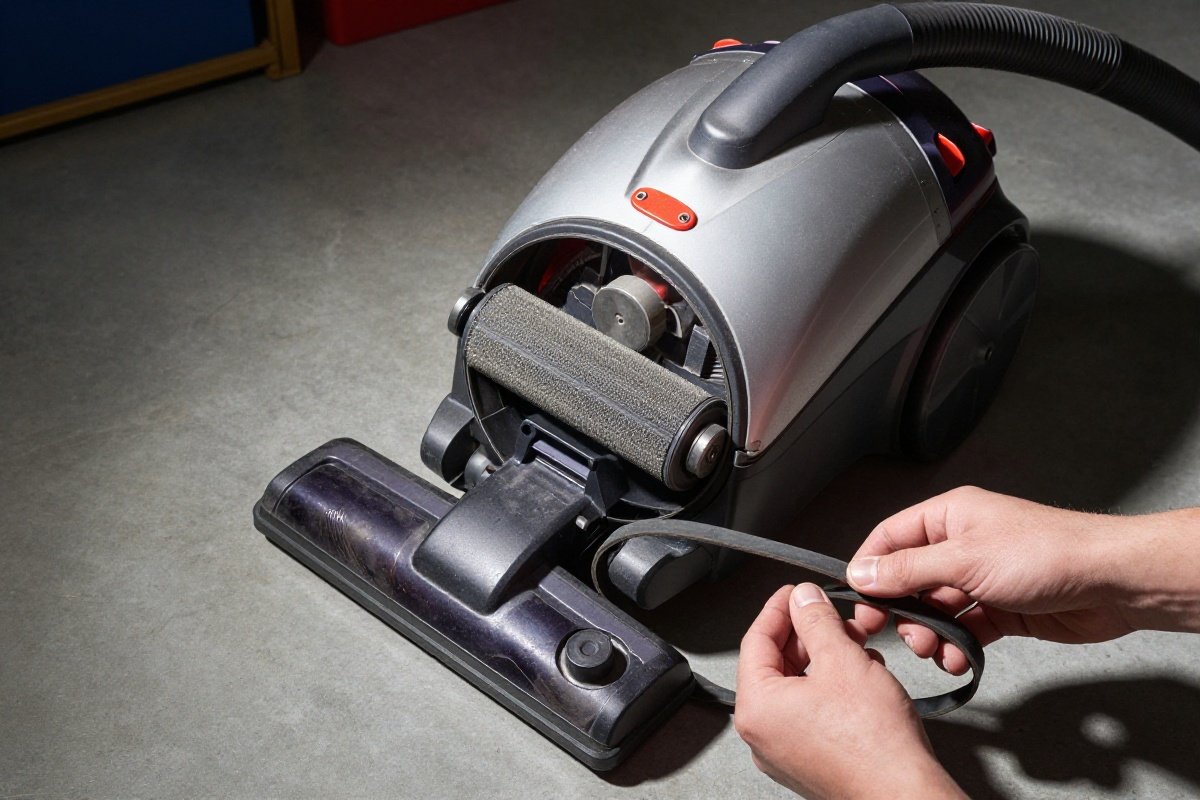
- Check for reset button: Some vacuums have thermal cutoffs for brush motors Belt Replacement: Most upright vacuums use rubber belts that stretch and break over time (6-12 month lifespan).
Replacement Process:
- Unplug the vacuum
- Remove the brush roll cover (usually 2-4 screws)
- Remove the old belt from motor shaft and brush roll
- Install new belt on motor shaft first
- Stretch belt over brush roll (requires some force)
- Reinstall brush roll and cover
Belt kits are inexpensive, typically sold in packs of 2-4 belts.
Brush Roll Spins but Doesn’t Clean
Worn Bristles: Brush roll bristles wear down over time. If bristles are shorter than 1/4 inch or unevenly worn, replace the brush roll (a modest expense).
Incorrect Height Setting: Verify the vacuum height adjustment matches your carpet pile. Too high = no agitation. Too low = motor strain.
Troubleshooting Common Problems
Understanding specific symptoms helps diagnose issues faster. Here’s a detailed breakdown of common problems you may encounter with your vacuum in 2026.
Loss of Suction Diagnosis
Symptoms: Reduced airflow, poor debris pickup, weak hose suction
Diagnostic Steps:
- Check dustbin fullness first - empty if over 2/3 full
- Inspect pre-motor filter: remove and hold to light; if blocked, clean or replace
- Check post-motor/HEPA filter: these should be replaced every 6-12 months
- Disconnect hose and look through it toward a light source to spot blockages
- Examine all hose connections for cracks or loose fittings that cause air leaks
Solutions:
- Full dustbin: Empty completely and wipe interior
- Clogged filters: Wash foam filters (24-hour dry time), replace paper filters
- Hose blockages: Use straightened coat hanger or compressed air to clear
- Air leaks: Replace cracked hoses or tighten connections
Brush Roll Not Spinning
Symptoms: Vacuum runs but brush roll stationary; carpet not agitating
Diagnostic Steps:
- Unplug vacuum, turn over, and manually spin brush roll
- If stuck: Check for hair wrap around bearings or brush
- Remove brush cover and inspect belt: should be tight with no cracks
- Check belt tension: a loose belt that slips needs replacement
- Test motor pulley: ensure it spins freely when vacuum is on
Solutions:
- Hair wrap: Cut with scissors, peel away
- Broken belt: Replace with manufacturer-specified belt
- Seized brush roll bearings: Replace entire brush assembly
- Motor pulley issues: May require professional repair
Burning Smell Issues
Symptoms: Distinct burning odor during operation, may trigger thermal shutoff
Diagnostic Steps:
- STOP immediately - unplug and let cool for 30 minutes
- Identify odor type: rubber smell = belt issue; electrical = motor/wiring
- Remove brush cover and inspect belt for melting or glazing
- Check brush roll spins freely - seized brush causes belt slip and burn
- Inspect motor housing for discoloration or melted plastic
Solutions:
- Rubber smell: Replace belt, ensure brush spins freely
- Electrical smell: Professional repair required - fire risk
- Persistent odor after fixes: Replace vacuum
Overheating Problems
Symptoms: Vacuum shuts off during use, hot exterior, burning smell
Diagnostic Steps:
- Check all filters - clogged filters are the #1 cause of overheating
- Verify dustbin is empty and airflow paths clear
- Check for brush roll obstructions causing motor strain
- Feel motor housing after brief operation - excessive heat indicates motor wear
- Check thermal cutoff - some models have resettable thermal switches
Solutions:
- Clogged airflow: Clean/replace all filters, clear blockages
- Overfilled dustbin: Empty completely before use
- Motor strain: Remove brush roll obstructions
- Repeated overheating: May indicate motor failure approaching
Robot Vacuum Specific Issues
Robot vacuums present unique troubleshooting challenges due to autonomous operation. Navigation Problems:
- Symptoms: Erratic movement, missing areas, bumping repeatedly
- Causes: Dirty sensors, software glitches, low lighting
- Fixes: Clean cliff sensors and camera lenses with dry cloth; update firmware; ensure adequate lighting
Charging Failures:
- Symptoms: Won’t dock, low battery errors, won’t hold charge
- Causes: Dirty contacts, battery degradation, dock placement
- Fixes: Clean charging contacts on robot and dock; reposition dock against wall with 3ft clearance; replace battery if over 2 years old
Clogged Brushes:
- Symptoms: Poor pickup, error messages, tangled brush warnings
- Fixes: Remove and clean main brush and side brushes weekly; clear hair from bearings
Essential Tools for DIY Repairs
Having the right tools makes vacuum repair straightforward and efficient.
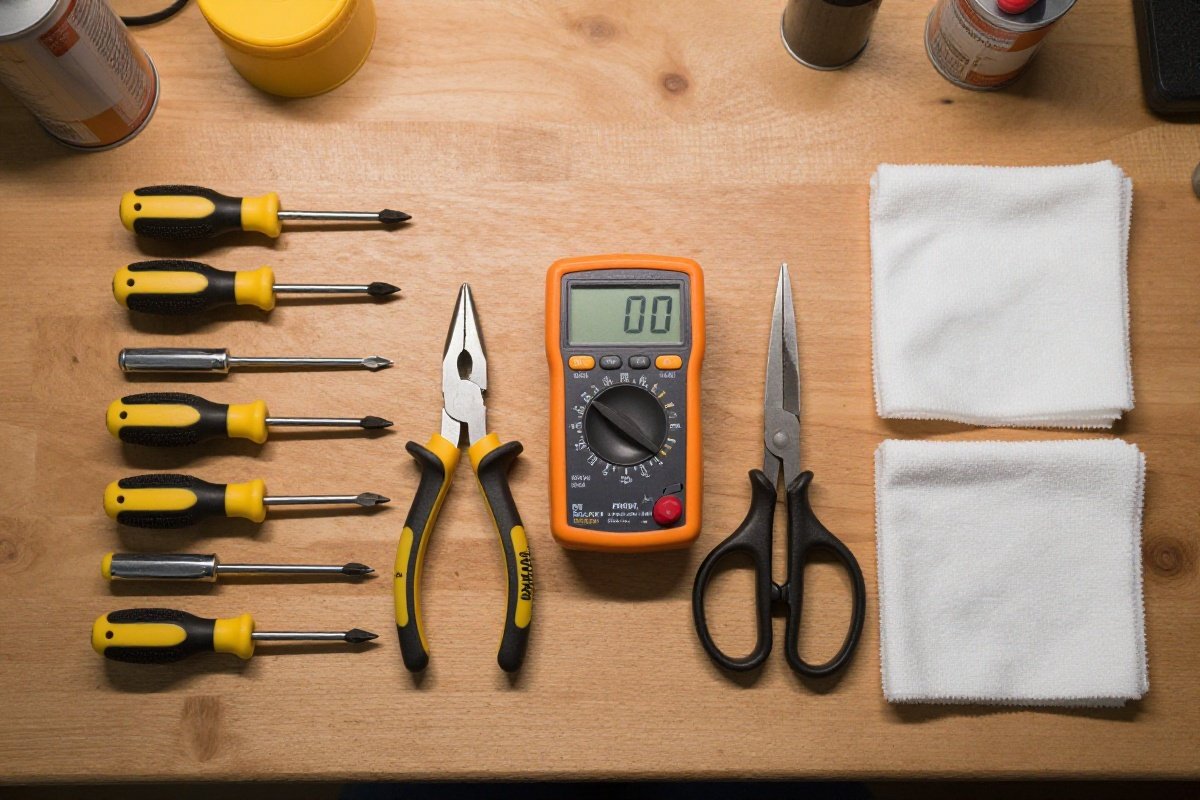
Basic Tool Kit:
- Screwdriver set: Phillips #1, #2, #3; flat-head small and medium; precision screwdrivers
- Pliers: Needle-nose for tight spaces, slip-joint for gripping
- Wire cutters: For trimming ties and cutting wires cleanly
- Multimeter: Essential for electrical testing - continuity, voltage, resistance (budget-friendly)
- Flashlight/headlamp: LED for inspecting dark crevices
- Scissors: Heavy-duty for cutting hair from brush rolls
Cleaning Supplies:
- Microfiber cloths for delicate parts
- Soft-bristle brush for dust removal
- Compressed air canister for blowing out tight spaces
- Enzyme cleaner for odor elimination
Safety Equipment:
- Dust mask when cleaning filters
- Safety glasses when working with tensioned belts
- Work gloves for handling sharp edges
Preventative Maintenance Schedules
Regular maintenance prevents costly repairs and extends vacuum lifespan significantly.
Weekly Maintenance:
- Empty dustbin or check bag fullness
- Remove hair and debris from brush roll
- Wipe exterior with damp cloth
- Check for visible blockages
Monthly Maintenance:
- Clean or replace pre-motor filters
- Deep clean brush roll with scissors and brush
- Inspect belt condition and tension
- Clear and check hose for cracks
- Wash dustbin with warm soapy water (dry 24 hours)
Quarterly Maintenance (Every 3 Months):
- Replace post-motor and HEPA filters
- Deep clean cyclone assembly on bagless models
- Replace belts showing wear
- Inspect power cord for damage
- Check brush roll bristle length (replace if under 1/4 inch)
Annual Maintenance:
- Replace all filters regardless of condition
- Professional service for premium models (Miele, SEBO)
- Complete teardown and deep clean
- Evaluate performance vs. new models
2026 Technology Considerations: Modern vacuums incorporate advanced technology requiring specific care:
-
HEPA Filter Maintenance: Never wash unless explicitly labeled washable. Replace annually for allergy sufferers. Check seals around HEPA housing - air leaks bypass filtration entirely.
-
Smart Sensor Care: Robot vacuums use optical sensors requiring gentle cleaning. Use dry microfiber cloth on camera lenses and IR sensors. Avoid cleaning solutions that leave residue.
-
Battery Management: Lithium-ion batteries perform best when kept between 20-80% charge. Avoid leaving cordless vacuums on chargers indefinitely.
When to DIY vs. When to Call a Professional
Understanding repair complexity helps you decide which fixes are appropriate for home DIY and which require expert help.
DIY-Appropriate Repairs
These repairs require minimal technical skill and present low risk:
Filter Replacement: Simplest maintenance task. Most filters release with button press or twist. Use manufacturer-approved replacements to maintain warranty. Takes 2 minutes. Cost: very affordable.
Belt Replacement: Requires removing brush cover (2-4 screws). Stretch new belt over motor shaft first, then brush roll. Takes 10-15 minutes. Cost: minimal.
Clog Removal: Visual inspection and physical clearing requires no special tools. Use straightened coat hanger or drain snake for stubborn clogs. Cost: essentially free.
Brush Roll Replacement: Remove hair with scissors or replace entire assembly if bristles worn. Most brush rolls snap out or remove with single screw. Cost: modest.
Battery Replacement (Cordless): Most batteries slide out or remove with 2-4 screws. Match voltage exactly. OEM maintains warranty; aftermarket saves money. Cost: moderate.
Professional-Only Repairs
These repairs require specialized expertise or present safety risks:
Motor Rewinding/Replacement: Vacuum motors contain balanced components and electrical windings. Improper installation causes vibration, reduced suction, or fire hazards. Parts and labor together represent a significant investment.
Electrical Issues: Circuit board failures, wiring shorts, and complex switch problems require electrical expertise. Incorrect repairs create shock and fire risks. These repairs are costly.
Warranty-Covered Issues: Any repair under manufacturer warranty should go to authorized service centers. DIY attempts void coverage and may cause claim denial.
High-End Canister Motors: Premium brands like Miele and SEBO use sealed motor units worth professional repair. These premium vacuums often have 5-10 year warranties.
Cost-Benefit Analysis
When Repair Makes Sense:
- Vacuum was a mid-range or premium purchase and under 5 years old
- Problem is minor (clog, filter, belt, hose)
- Replacement parts available
- Repair cost under 50% of replacement cost
When Replacement Makes Sense:
- Vacuum was a budget purchase
- Age over 8 years
- Motor failure (repair costs often exceed the vacuum’s value)
- Multiple major failures
- Parts unavailable
Finding Qualified Repair Shops
Authorized Service Centers: Check manufacturer websites for authorized networks. These technicians receive brand-specific training. Warranty repairs must use authorized service.
Independent Vacuum Shops: Look for shops specializing in vacuums rather than general appliance repair. Ask about experience with your specific brand.
Questions to Ask:
- What is the diagnostic fee and is it applied to repairs?
- Do you have experience with [brand/model]?
- What warranty do you provide on repairs?
- Can you provide a written estimate before proceeding?
Repair vs Replace: Cost-Benefit Analysis
Not every vacuum deserves repair. Use this framework to decide:
When to Repair
✅ Vacuum was a mid-range or premium purchase ✅ Age under 5 years ✅ Problem is minor: Clog, filter, belt, hose ✅ Replacement parts available ✅ You’re comfortable with DIY
Typical Repair Costs (from least to most expensive):
- Filters: very affordable
- Belts: very affordable
- Brush roll: modest
- Hose: moderate
- Battery (cordless): moderate to significant
When to Replace
❌ Vacuum was a budget purchase ❌ Age over 8 years ❌ Motor failure (repair often costs more than the vacuum is worth) ❌ Multiple major failures ❌ Parts unavailable
Replacement Thresholds:
- If repair estimate exceeds 50% of replacement cost, buy new
- For cordless vacuums over 3 years old with battery failure, replacement often makes sense
- Budget vacuums: Repair only if under 2 years old with simple fix
Tools for Vacuum Repair
Basic toolkit for most repairs:
- Screwdrivers: Phillips #1 and #2, flat-head various sizes
- Pliers: Needle-nose and standard
- Scissors: Heavy-duty for cutting hair
- Multimeter: For electrical testing (budget-friendly)
- Flashlight: For inspecting dark crevices
- Cleaning cloths: Microfiber for delicate parts
- Compressed air: For blowing out dust
Preventive Maintenance Schedule
Regular maintenance prevents most vacuum problems:
After Each Use:
- Empty dustbin or check bag
- Remove hair from brush roll
- Wipe exterior
Monthly:
- Clean filters (wash or tap out)
- Check belt condition
- Inspect hose for blockages
- Clean brush roll thoroughly
Every 6 Months:
- Replace filters (if non-washable)
- Deep clean cyclone (bagless models)
- Check and replace worn belts
- Inspect power cord for damage
Annually:
- Replace HEPA filters
- Professional service for premium models
- Evaluate performance vs new models
Further Reading
- How Does a Vacuum Cleaner Work? Motor Types, Suction Power & Filtration Explained
- Should You Buy a Refurbished Vacuum? [2026 Buyer’s Guide]
- Vacuum Buying Guide 2026: How to Choose the Best Vacuum Cleaner
When to Call a Professional
Some repairs exceed DIY scope:
- Motor rewinding: Requires specialized equipment
- Circuit board replacement: Complex electronics
- Warranty-covered issues: Don’t risk voiding coverage
- High-end canister vacuums: Miele, SEBO motors worth professional repair
Professional vacuum repair labor plus parts adds up quickly. For budget and mid-range vacuums, replacement is usually more economical.
Recommended Products
Dyson V15 Detect Replacement Battery
Dyson cordless battery replacementThis genuine Dyson replacement battery restores the V15 Detect's full 60-minute runtime with factory-spec capacity and safety certifications. Best for V15 owners who notice declining battery life and want the peace of mind of an OEM part backed by Dyson's quality standards.
What We Like
- Genuine Dyson quality
- 60-minute runtime restored
- Easy installation
What We Don't
- Expensive for a battery compared to third-party alternatives
- Aftermarket options available at lower cost with similar capacity
- Only compatible with specific V15 Detect models
Shark Navigator Lift-Away Belt Replacement Kit
Shark belt replacementThis belt replacement kit restores lost suction and brush roll spin on compatible Shark Navigator Lift-Away models with an easy DIY installation that avoids costly repairs. Best for Shark Navigator owners noticing reduced brush roll performance who want a quick, affordable maintenance fix.
What We Like
- Fits multiple Shark models
- Includes 2 belts
- Easy DIY installation
What We Don't
- Model-specific fit required - must verify compatibility before purchase
- Plastic tools included are basic and may break under heavy use
- Belts wear out and need replacement every 3 to 9 months depending on usage
Bissell ProHeat 2X Belt and Brush Roll Kit
Bissell carpet cleaner maintenanceThis OEM belt and brush roll kit restores full cleaning power to worn-out Bissell ProHeat 2X carpet cleaners with factory-spec components. Best for existing ProHeat 2X owners who notice reduced brush agitation or slipping belts and want to avoid the cost of replacing the entire machine.
What We Like
- Complete refresh kit
- Restores carpet cleaning performance
- Fits multiple Bissell models
What We Don't
- Requires partial disassembly of the carpet cleaner to install
- Must verify model compatibility before purchasing
- Belts stretch over time and need replacement every 6-12 months with heavy use
iRobot Roomba Replacement Parts Kit
Roomba maintenanceThis third-party replacement kit provides brushes, filters, and side brushes at a fraction of official iRobot parts pricing, making regular Roomba maintenance far more affordable. It is best for Roomba owners who replace consumables on schedule and want to stock up without paying OEM markup for routine wear items.
What We Like
- Includes brushes, filters, and side brush
- Extends Roomba lifespan
- Easy tool-free installation
What We Don't
- Generic parts, not OEM
- Compatibility varies by model
- Filters and brushes have limited lifespan and need replacement every 2-3 months
Continue Reading
Explore more buying guides content or browse our other categories.
Frequently Asked Questions
- When should I repair vs replace my vacuum?
- Repair vacuums costing $150+ that are under 5 years old with minor issues like clogs, belts, or filters. Replace vacuums over 8 years old, those with motor failure (repair costs $100+), or budget models under $100 where repair approaches replacement cost. Cordless vacuums with battery failure after 3+ years often warrant replacement since batteries cost 30-50% of a new unit.
- Why does my vacuum smell bad even after cleaning?
- Persistent odors usually indicate bacterial growth in the dustbin, filters, or brush roll from organic debris like pet hair or food particles. Deep clean all removable parts with warm soapy water, replace filters, and use a vacuum deodorizer. For severe cases, disassemble the brush housing and clean with enzyme cleaner. Ensure all parts are completely dry before reassembly.
- Can I fix a cordless vacuum that won't hold a charge?
- For Dyson and major brands, replacement batteries are available ($40-$100). Check if the battery or charger is the issue by testing with a voltmeter. If the battery voltage drops rapidly under load, replacement is needed. For off-brand cordless vacuums, batteries may be unavailable or uneconomical to replace - consider replacing the vacuum if it's over 3 years old.
- Why is my vacuum so loud suddenly?
- Sudden noise increases typically indicate a clogged airway, damaged fan blade, or motor bearing wear. Check for blockages in the hose, wand, and dustbin first. If clear, inspect the brush roll for debris or damage. Worn motor bearings create a high-pitched whine and usually mean motor replacement or new vacuum time. Grinding sounds suggest brush roll or belt issues.
- How do I know if my vacuum motor is burned out?
- Signs of motor failure include: burning smell, complete power loss (no suction or brush rotation), excessive heat, sparks, or loud grinding. Test by checking for suction at the hose without attachments - if none exists and filters are clean, the motor likely failed. Motor replacement costs $80-$150 in parts plus labor, often exceeding the value of vacuums under $200.
Written By
Home Vacuum Zone
Our team researches, tests, and reviews vacuum cleaners to help you make confident buying decisions.
Related Articles
Vacuum Noise Level Comparison: Decibel Ratings for 60+ Models (2026 Database)
Comprehensive vacuum noise level database with decibel ratings for 60+ models across every vacuum type. Find the quietest vacuums and understand what dB ratings actually mean.
Vacuum Suction Power Chart: AW, Pa & kPa Ratings Compared (2026 Database)
Comprehensive vacuum suction power database with air watts, pascals, and kPa ratings compared across every vacuum type. Find how much suction you actually need.
Bagged vs Bagless Vacuums: Which Type Is Actually Better?
Bagged and bagless vacuums each have distinct advantages for different households. We compare cost, filtration, allergen control, maintenance, and convenience to help you choose the right type.